Support for time zones has become ubiquitous in digital devices. The designs of the user interfaces for setting the time zone differ quite a bit from device to device, and from software program to software program. That is, they make for some great observation material.1
In this article, I will have a closer look at the time zone settings of three desktop operating systems: Apple Mac OS X 10.6, Microsoft Windows 7, and Ubuntu Linux 10. Specifically, I want to find out how easy it is to select the desired time zone via these two approaches:
-
If a user already knows her destination’s time zone, she will select it directly. (For this case, I posit that it is easier to remember a time zone by name than by UTC offset.)
- If a user does not know her destination’s time zone, she will search for the name of her destination, or the name of a bigger city that is close by. The corresponding time zone will then be determined the software.
Apple Mac OS X 10.6
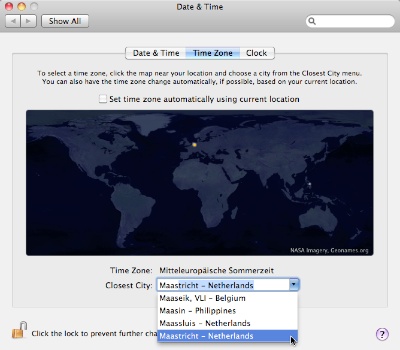
At the center of the time zone preferences in Mac OS X is a world map, which highlights the current time zone and the current location. Underneath the map, the time zone’s name is displayed, and a combo box shows the name of the “closest city”.
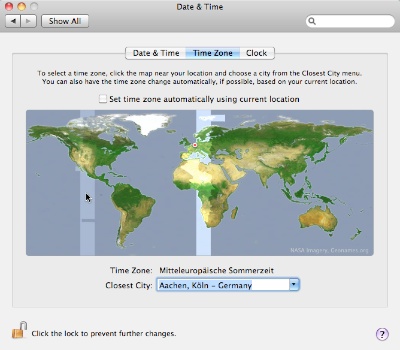
When you move the mouse pointer across the map, the time zone underneath it is highlighted. Clicking anywhere on the map changes the time zone and finds a city close to the geographical location that you clicked on.
When you open the combo box, the menu will list only cities that are, indeed, geographically close to the selected one. E.g., with Denver, Colorado, selected as the “Closest City,” the menu will contain several US cities within that time zone, but no Canadian or Mexican ones.
The combo box also serves as a search field for place names. As soon as you start typing, your search term is auto-completed, and a menu of further matches pops up. Every match is shown on the — now darkened — map with a pulsing white dot, and the current selection is highlighted by an orange dot.
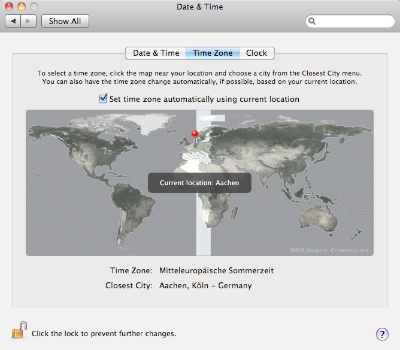
Above the map is a check box to have OS X automatically determine your current geographical location and select the appropriate time zone.
Selecting a time zone by its name is inconvenient, because there is no UI control that lets you select a time zone directly by name.
Unless you know where the desired time zone region is on the world map, you will need to keep clicking on the map and checking the Time Zone text field until you have found the right one. If the name of the time zone that the mouse pointer hovers over was displayed as a tooltip or in a bezel as seen in the screenshot above (“Current location: Aachen”), this operation would be faster and more convenient.
Unfortunately, the way OS X provides time zone names is highly inconsistent: for some time zones, clicking on the Time Zone text field will toggle between a time zone’s name and its abbreviation (e.g., “CEST” and “Central European Summer Time”); for some, it will toggle between the UTC offset and the abbreviation (e.g., “GMT-08:00” and “AKDT” [that’s “Alaska Daylight Time”]): and for others, it will offer the UTC offset only.
I wish Apple would clean this up so that, for every time zone, the display will always toggle between its full name (plus its abbreviation in parentheses) and the UTC offset.2
Finding a time zone via a place name works like a charm: as mentioned before, as soon as a you start typing into the combo box, the preferences panel will compile a list of matching place names inside the combo box’s menu, and mark each one on the map.
The list of cities is extensive and includes many lesser-known mid-size towns like Venlo in Holland, Slough in the UK, or Broomfield, CO, in the US, so that you will easily find matches beyond the usual major metropolises.
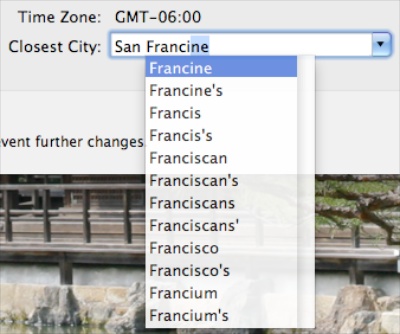
Also noteworthy about this design is, unfortunately, the annoying behavior when trying to leave the city search: once you’ve started typing into the combo box, hitting the Escape key will not leave the text field and reset it to its previous selection.. Instead, it will open a menu with what appear to be spell-check suggestions.
In the context of searching for a city name, the spell-check menu does not make too much sense. Being able to use the Escape key to revert the combo box to the previous location would be the better design choice.
As far as I can tell, in the current implementation, you can only end a search by clicking somewhere on the map, which, of course, also changes the time zone/closest city selection.
Microsoft Windows 7
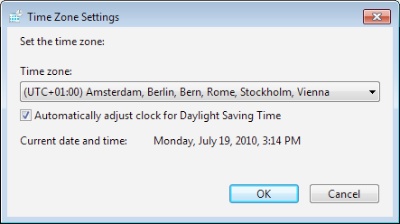
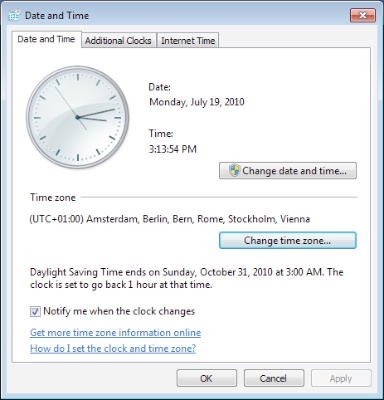
In Windows 7, you change the time zone in a small dialog box which contains a popup menu with a list of time zones and a checkbox for automatic Daylight Saving Time adjustment, and which displays the current date and time for the selected time zone.
You open that dialog box by clicking the button “Change time zone…” under the Date and Time tab in Windows’ Date and Time control panel.
The dialog box’s popup menu has multiple entries for each time zone, which are identified as UTC offset. Each entry also lists a number of cities, which are grouped roughly by geographical region.
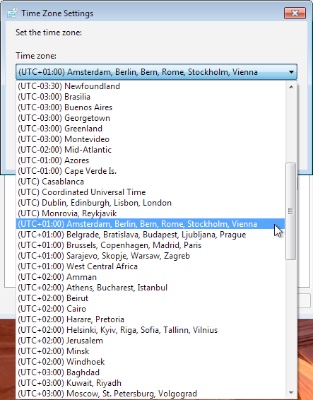
Selecting a time zone by its name is limited to North American time zones — Pacific, Mountain, Central, Eastern, and Atlantic — as these are the only ones included in the menu. For any other time zones, the user needs to know the UTC offset, or resort to searching via place names.
A major issues with this design is that the menu items do not reflect changes for daylight saving time, so that quite a few of the menu’s entries are simply incorrect when DST is in effect.
For example, Denver, Colorado, has Mountain (Standard) Time, which is UTC-07:00, or Mountain Daylight Time, which is UTC-06:00. The menu in Windows 7, however, only offers “(UTC-07:00) Mountain Time (US & Canada),” which time zone “name,” during DST, is off by an hour.
Finding a time zone via a place name is very tedious for two reasons: first, the menu includes only a few major cities for each time zone. And second, if you don’t have a rough idea in which time zone your destination is located, you will have to search through much of the menu due to it being sorted by UTC offset, and not by geographical region or place name.
Also noteworthy about this design is the fact that the dialog box with the time zone menu is modal versus the Date and Time control panel. Therefore, you cannot move the control panel as long as the dialog box is open.
Truth be told, moving the time zone menu and DST checkbox into a dedicated dialog box seems like an odd decision. I don’t see how this has any advantages over placing both elements right inside the Date and Time control panel.
Ubuntu 10
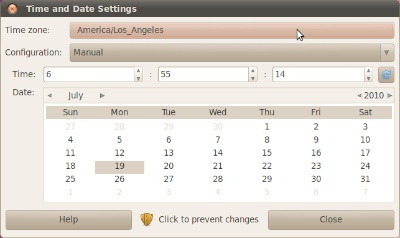
Similar to Windows 7, Ubuntu 10 offers a modal dialog box from within its Time and Date Settings.3 Since Ubuntu handles windows differently than Windows (no pun intended…), though, you can at least move the Time and Date Settings window while the Time zone dialog box is open.
The Time zone dialog box sports a scrollable map view and a popup menu. When hovering the mouse pointer over the map, one of a number of marked locations is highlighted, and its region and name are displayed beneath the map. Clicking on the map selects the highlighted location and updates the popup menu accordingly.4
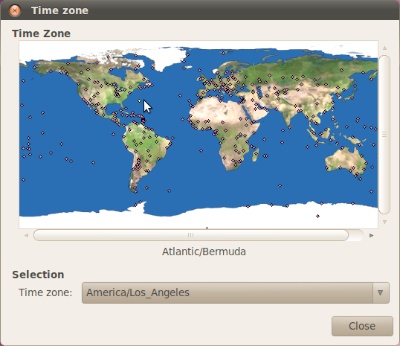
The popup menu is a flat list of places grouped by geographical region, and each menu item lists both the region and the place name.
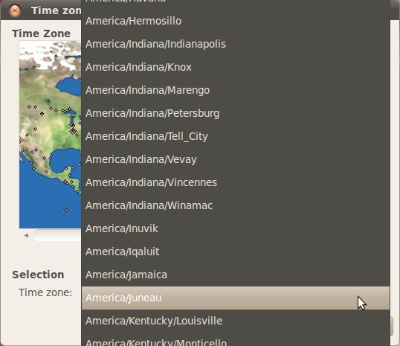
Selecting a time zone by its name is impossible, because despite its label, the “Time zone” menu does not actually list any time zones. It lists place names; time zone names or GMT/UTC offsets are missing completely.
Finding a time zone via a place name works reasonably well thanks to the menu’s grouping and sort order.
Separating the two levels of hierarchy — regions and place names — into separate user interface controls would probably make this kind of search even easier To this end, a hierarchical menu would be an option, as would be two separate menus for region and place, with the entries in the latter being filtered based on the selection of the former.
Also noteworthy about this design is that clicking on the map not only selects a location, but also zooms into the map. Right-clicking on the map zooms out again, and there are only these two zoom levels.
Linking two unrelated functions into one user action like this is bad design. Similarly problematic is providing a related undo-function that is difficult to discover: in this case, it is highly likely that you will run into the zoom-in function by accident when making a selection on the map. Finding out that the _un_zoom function is triggered by right-clicking, however, will take more (unnecessary) effort.
This detail would be easily solved by dedicated zoom buttons placed near the map. Then again, the map dialog box is resizable, and the map resizes with it. Therefore, the click-to-zoom feature seems more like a UI gimmick to me than a useful feature, and I would consider removing it altogether.
Regarding another detail, some of the entries in the Time zone menu contain a third hierarchy level for US states or country names, such as in “America/Argentina/Cordoba” or “America/North_Dakota/New_Salem”. The latter highlights another oddity: underscores instead of blanks. A user interface should be optimized for human use, and humans prefer blanks in these cases. For the sake of consistency, these two details should be fixed as well.
Some suggestions for what to keep in mind when implementing time zone support
After playing around with these three control panels, I would suggest the following guidelines for implementing time zone support:
-
Allow the user to directly select a time zone by name, and/or let her find one via a place name search.
-
If only one selection method is provided, make it the more-natural-for-humans place name search.
-
Sort time zone menus by time zone and include both UTC offset and time zone names.
-
Group place name menus by region, and sort them by region, then by place name.
-
Include a large set of places so that users can easily find one close by.
-
Ideally, provide an actual text search field for place names.
-
If a map is provided, clearly highlight both the selected time zone and the selected location, and identify both by name.
- If you have the know how, implement automatic selection of the time zone. This will always beat manual selection in terms of accuracy and ease-of-use. If, that is, it is reliable. (If it’s not, then do not implement it at all.)
This is merely a personal list that has not been verified by any actual user testing. If you think that something should be added to this list, or needs clarification or plain correction, please email me with your feedback.
-
If you would like to learn more about time zones in general, including their history, the Wikipedia article on the subject provides a lot of interesting insight. ↩
-
Wikipedia has an extensive list of all time zone names and their abbreviations. ↩
-
I’d love to know on how many operating systems this preferences panel is labeled “Date and Time,” and how often “Time and Date” is used. ↩
-
If I’d feel tempted to feed my prejudice about how most open source developers lack attention to detail in UI design, I’d spend some time nitpicking about the different capitalization of “Time zone” versus “Time Zone” in this dialog box… ↩