The sit/stand desk in our home studio is the best furniture investment we ever made. Prolonged sitting is linked to serious health risks, and a sit/stand desk helps alleviate those risks. I also feel that literally changing my perspective at the desk helps me think more clearly and concentrate longer.
Two directions equals two buttons
The desk is motorized, and its entire user interface consists of two buttons embedded in a little control panel. The triangular shape and orientation of the buttons clearly reflect which one will raise the desk, and which one will lower it. Push a button, and the desk starts moving; release the button, and the movement stops.
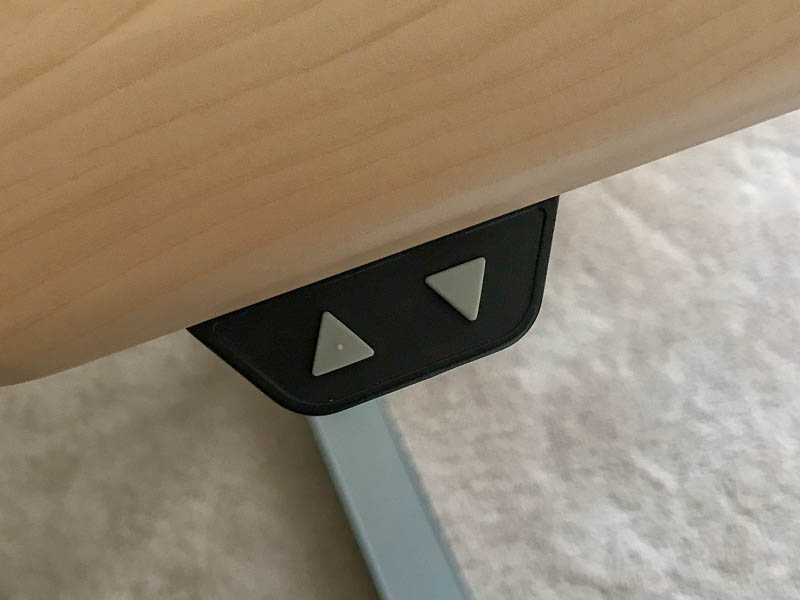
You can easily tell the buttons apart even without looking at them: a little bump is molded onto the top of the “Up” button, while the surface of the “Down” button is perfectly smooth. By just feeling for that bump, you can identify the desired button.
As a neat detail, the entire panel fully slides underneath the desktop, so you can’t accidentally bump into it and hurt yourself.
Adjust your desktop with the touch of a butt(on)
In my previous job, I was lucky enough to also have a sit/stand desk at work. It’s a different model from the one we have at home. Besides offering buttons for manually adjusting its height, this model features three preset memory slots and even displays the current desk height.
While I think that the height display is a bit gratuitous and gimmicky, the memory slots are a nice feature. Being able to “drive” the desk all the way to your preferred standing or sitting height with a simple tap of a button makes that adjustment more convenient and more precise.
Unfortunately, the convenience and precision come with an annoying side effect, and it’s the control panel’s design that is to blame.
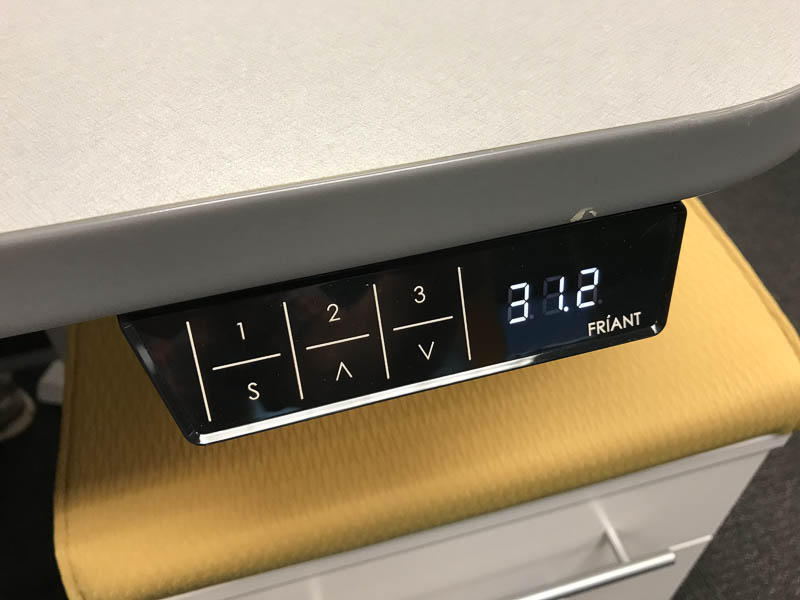
The control panel is implemented as a touch screen. This makes it way too easy to trigger any of the desk’s functions by just leaning against the desk’s edge. If you trigger any of the three presets this way, the desk will relentlessly move towards the height it just recalled from memory.
Of course you can make the desk’s motor stop, but doing so is not obvious: you “just” need to touch any of the panel’s buttons to do so. Once you learn this, it might be easy enough to remember, but having a dedicated “cancel” or “stop the motor” affordance exposed right on the panel, would be much more user-friendly.
The fundamental accessibility flaw of touch-control buttons
There is a much bigger problem with using a touch panel for this kind of application, though, and it’s a more general issue, too: the near-complete lack of accessibility for vision-impaired users.
The markings and labels on the buttons are screen-printed, and the layer of paint is so thin that you can hardly feel them at all. Hence, you cannot easily differentiate and locate the six buttons just by running your finger tips over the panel. And, of course, this being a touch panel, running your fingers might also immediately trigger a button.
Just like users with 20/20 vision need meaningful visual feedback on their computer screens, vision-impaired users need meaningful acoustic and/or tactile feedback.
In this particular example, the simple, mechanical two-button solution provides just that, including the fine detail of the bump on the “Up” button. While modern, sleek, and “shiny,” the touch-screen approach pales in comparison when it comes to usability and accessibility.