A User-Customizable User Guide

Manuals that ship with hardware appliances often contain instructions in more than one language. Such multi-lingual documentation simplifies logistics and reduces costs, because only a single document needs to be handled during production, and a single product package can be sold in multiple countries.

For the users, however, these manuals come at a price. They can be more tedious to navigate than a single-language document, and they require more storage space.

When I recently unpacked an electronics gadget, the manual inside the box was folded into a dense, almost children’s fist-sized wad of paper.

Stack of unfolded individual paper sheets making up the user manual

At first sight, it reminded me of an oversized version of the information flyers that you find in medicine packages — and whose folding pattern is so complex that you can never get it back into the box.

Unexpectedly, the wad unfolded into several individual double-sided sheets, each of which contains instructions in two languages.

Stack of unfolded individual paper sheets making up the user manual

Two perforation lines run from top to bottom along the sheets’ centers.

Close-up of the two parallel perforation lines along the center of a sheet from the manual

Thanks to the perforation, you can rip each sheet in two, so that you end up with a customized manual that only contains instructions in your own language.

Single sheet from the manual in front of a stack of the remaining sheets in other languages

This design is a double-edged sword, because you throw away the majority of the printed document, so that the waste of resources — paper, ink, and energy — is the same as with bound booklets.

Customizing the document in this manner does make it more usable, though, because it reduces its content scope and physical size to just exactly what you need.

I wonder if there is a way to apply this approach to larger documents whose contents exceed a single page per language.

Improving File Searches With Search Tokens

Thanks to powerful search features that have been developed in recent years, you no longer need to manually browse your computer’s hard drive if you’re looking for a file. Instead, you let the machine’s search technology find the file for you.

As another advancement in this field, Apple introduced a novel UI element in OS X 10.7 Lion: The so called “search token” aims to simplify compound searches.

Entering compound file searches

A compound search combines searches across several metadata fields to fine-tune the list of resulting matches.

For example, to find all presentations about Mac topics from this year1, you might look for files whose …

  • kind is (Keynote) presentation,
  • date is this year, and
  • contents include “Mac”.

Previous versions of Mac OS X offered two methods for entering this kind of search. The more efficient one uses Spotlight with search operators like “kind:” or “date:”.

To run the example search, you would enter “kind:pdf date:2011 mac”2 into Spotlight’s search field.

Apple has published a complete list of Spotlight operators as well as further information on how to use Spotlight operators on their support website.

FinderSearchSpotlight

Besides having to remember which operators are available, and what their correct spelling is, you must know about this Spotlight feature in the first place. The chance of accidentally discovering it is very slim.

The second method for entering a compound search is by using the metadata fields in the Finder’s search window.

FinderSearchWindow

While entering a search this way is not as efficient as using Spotlight operators, it is much easier to discover, and the menus provide a built-in reference for the searchable file attributes.

The best of both of these methods has been combined into the new “search tokens”: Pure text entry and a menu of search suggestions.

Entering compound file searches with tokens

As soon as you start typing something into a Finder window’s search field, a menu pops up. Its contents are grouped by the metadata fields in which your search string was found.

FinderSearchSuggestions

When you see what you’re looking for, you select its menu item with a mouse click or via the cursor keys on your keyboard. There is no need to switch between keyboard and mouse while you refine your search.

When you make a selection from the menu, the search is encapsulated in a lozenge-shaped token, which combines your search term with the metadata field within which the search is performed.

FinderSearchToken

After adding a new token, you can continue typing to further refine your search.

FinderSearchTokenCompound

Unfortunately, the search field has a maximum width of about 35 characters, regardless of how you configure the toolbar in the Finder windows.

On average, this should be sufficient room for two or three search tokens. If you enter a more complex search, however, you cannot see the entire set of criteria at a single glance anymore.3

Combining the best of both worlds — and adding a caveat

Entering compound searches with the new search tokens merges the efficiency of typing into a text field with the discoverability of a menu.

Thanks to the tokens, you need to type even less than if you used Spotlight operators. That’s because you only need to enter the search terms, but not the operators themselves, as you pick these from the menu.

Besides the limited space in the search field, the current implementation of search tokens has one caveat: They only support a small subset of all available file metadata fields. Many more are available in the search section underneath the Finder windows’ toolbar.

Despite these shortcomings, the search tokens make performing compound searches of medium complexity more convenient and more efficient than either of the older methods.


  1. This article was written in 2011. Therefore, even though it was published in early 2012, it refers to “this year” as being 2011. 

  2. According to Apple’s documentation, “date:this year” is supported as well, but I couldn’t get it to work on my machine. Hence the hard-coded “2011”. 

  3. There is a workaround, but it’s rather tedious: If you save a search and then select Show Search Criteria from the resulting Smart Folder’s context menu, the search criteria will not be shown as tokens anymore, but appear in the search fields underneath the toolbar. 

OS X’s Most Un-Mac-like Feature

It’s surprising how often my Macs fail to recognize a CD or DVD when I insert it into the optical drive. The disk is properly pulled into the drive slot and spins up, but its icon does not appear in the Finder.

In order to force-eject such a rogue disk, you have to restart the Mac and hold down the mouse button during the boot process. Before the log in screen appears, the disk will pop out of the drive.

OS X Help page, explaining how to eject disks that refuse to be ejected via the regular command

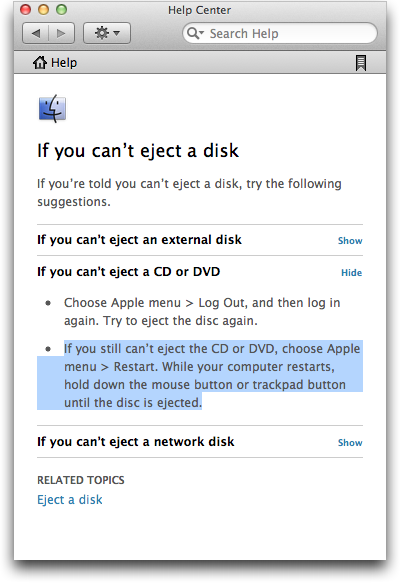
This brute-force method has worked for me every time I used it, but it is massively disruptive.

Imagine doing creative work on your computer. You have meticulously arranged numerous windows from multiple applications into a super-efficient workspace.

And now you have to close all apps and shut down the entire machine, just because the OS does not properly recognize a CD.

Insane!

You can’t select what isn’t there, …

Why won’t the OS let me select some icon in the Finder and then execute the Eject command? Well, if there is no icon that represents the disk in the drive, how would you select it?

Part of the problem is that the Mac’s Finder differentiates between a (physical) drive and the (logical) volumes stored on that drive. This differentiation also applies to drives with removable media.

In the Finder you will only see icons representing volumes, but none for the physical devices. This is different on Windows.

On Microsoft’s OS, icons for drives with removable media like CD/DVD drives, etc. always appear, regardless of whether there is a medium inside that drive, or not.

In everyday use, there is a drawback to Microsoft’s design, because if you select such a drive while it’s empty, Windows will still try to read from it.

It takes a few seconds until the system recognizes that there is no medium inside the drive, and during that time you cannot continue working inside the specific Windows Explorer window. Which makes inadvertently clicking on an empty drive’s icon rather annoying.

… or can you?!

There is one application on the Mac, however, that does let you access physical drives: Disk Utility.

The Disk Utility application displaying both physical drives and logical volumes, and a Finder window listing only volumes

As you can see in the screenshot, the Finder only displays the volume — “Beyond Tomorrow” — for the computer’s internal hard drive.

In Disk Utility, in contrast, you can also access the physical hard drive as well as the optical drive. The latter is grayed out, since there is no medium inside.

This application would be the logical place for offering an Eject command that operates on the drive, not the medium. Such a function would force-eject whatever is inside the drive, regardless of whether the Finder has properly recognized it, or not.

In fact, this function should probably be deactivated, unless the Finder failed to recognize the disk, so that the user has to properly eject mounted disks to avoid data loss.

Then again, most users will have no need to ever use the Disk Utility application. They may even be scared by it due to its deep-down-inside-the-drives’-guts functionality.

A rare specimen: the non-evil time-out

That’s why I would like to see a different solution to this problem: A time-out!

As much as I loathe user interface time-outs in general, it would make a lot of sense for the computer to automatically eject a removable medium, if it is not recognized within a few seconds after it has been placed inside the drive.

Add in an error message window that informs the user, why the disk has been ejected, and you have a very user-friendly solution to an as-of-yet nasty problem.