In a previous article I asked “What time is your zone?”, and compared the ways in which you set a computer’s system time zone in Mac OS X, Windows, and Ubuntu Linux. Besides the system-wide setting, you can also find support for time zones in application software like the three apps I observed for this article.
iCal: Setting the time zone for the calendar view
The obvious example is, of course, a calendar application like iCal, which ships with Apple’s Mac OS X operating system.1
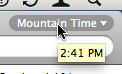
The time zone for iCal’s calendar view is selected via a menu in the top-right corner of the application’s single main window.2 Note the nifty tooltip: when you hover the mouse pointer over the menu, a tooltip will display the time for the currently selected time zone.
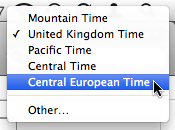
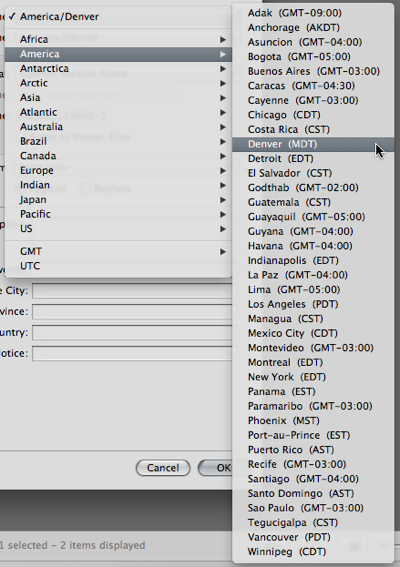
Initially, the only entry in this menu is the computer’s system time zone. Selecting Other… brings up a dialog box with a map and a search field. By clicking on the map or searching for a city, you select another time zone to be added to the menu.
Unfortunately, the underlying database of cities is not nearly as extensive as the one that powers Mac OS X’s Date & Time system preferences. Where the latter even finds very small towns (and this has been improved further in OS X 10.7 Lion), iCal is only aware of one or two major cities per country and time zone.
Unless you travel to a lot of different countries all over the planet, you will likely only require a handful of time zones to be listed in this menu. Hence, instead of providing a lengthy menu of all time zones known to man, it makes sense to require the user to manually add further time zones.
iCal: Setting the time zone for an event
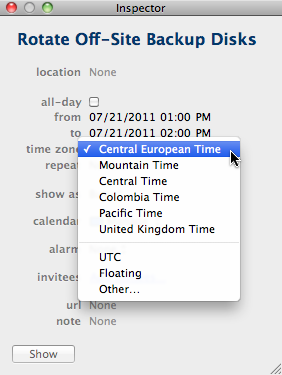
In iCal, time zones are assigned to events via a menu in an event inspector window. This menu contains two items that are not found in the main window’s menu: UTC and Floating.
UTC — [Universal Time Coordinated](http://en.wikipedia.org/wiki/Coordinated_Universal_Time “Read the Wikipedia entry on UTC” ) — is the world-wide authoritative time reference, so it deserves its special spot.
“Floating” is not actually a time zone. Rather, it denotes that an event’s time should not be adjusted for time zones at all. Instead, floating events are displayed at the same time in the calendar view, regardless what time zone that view is set to.
This is a handy feature for events that you always perform at the same time, no matter where you are, for example your weekly GTD review or your daily meditation session.
When you create a new event, iCal pre-sets the inspector menu to the time zone selected for iCal’s main window. If the desired time zone is not yet included in the menu, you can add a new one from within the inspector window via the Other… menu item.
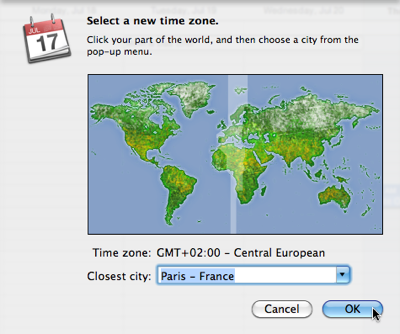
This brings up a little map view, in which the time zone for the current menu selection is highlighted, but no other information is displayed.
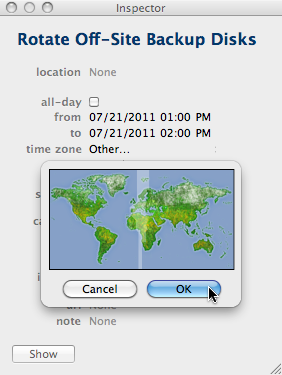
With your only option being to click on the map and then select a city from a popup menu, finding the right time zone can be tedious unless you already have at least a rough idea of its geographical location.
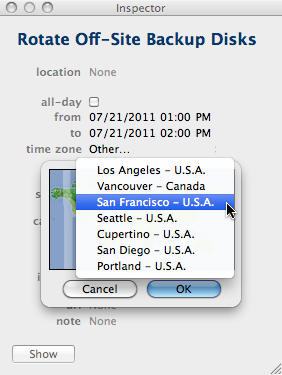
Finding a time zone based on a city name is easier when you use the main window’s menu, because that gives you the comfort of the search field. Since the menus in the main window and the event inspector are synchronized, you can freely choose which path you prefer.
iCal: Two menus that (unfortunately) are like one
While this synchronization of the two time zone menus generally makes sense, I have mixed feelings about this feature.
Unfortunately, there is no way to remove any entries from either menu (unless you are willing to manually edit iCal’s preferences file). Whenever you add a new time zone in iCal, you’re stuck with it.
What’s worse, however, is that both menus are always sync’ed even though it not always makes sense to add an events’ time zone to the calendar view menu.
Imagine, for example, that you have scheduled a phone call with someone in Sydney, Australia, and that person gives you the desired call time for their own time zone.
Entering the event for the appropriate time zone, Australia Eastern, spares you the trouble of converting the times to your own time zone. But unless you ever travel to Australia, why would you need to set your calendar’s main view to that time zone?
In other words, adding Australia Eastern to the event time zone menu makes sense, whereas adding it to the calendar view menu only adds clutter, because you will most likely never set your calendar to this location.
iCal: A major change of cat, a minor change of time zone support
For Mac OS 10.7, Apple redesigned the visual appearance of the calendar app. With regards to time zones, though, there is only one change: instead of time zone names, the menus now list countries. E.g., instead of Central European Time, it may list Germany Time.
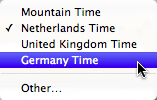
This does result in multiple menu items for the same time zone, e.g., Germany Time and Netherlands Time, which both lie in the Central European Time zone. Then again, it is easier to remember what country you are traveling to than the time zone for that country.
Aperture: Being smart about daylight saving time
My favorite piece of advice on photo management is to always keep your camera’s clock set to UTC and make all time zone adjustments in your photo software. That way, you never have to remember to change the camera’s clock, or try to recall between which photos you did so.3
In Apple Aperture, which I use for managing my photos, you adjust the time zone via a pair of popup menus: one for selecting the camera’s time zone, and one for the selecting the time zone of the location where the photo was taken.
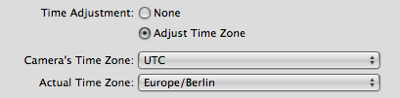
Aperture pre-selects the computer’s time zone in both menus, so that, in most cases4, all you need to do is set the camera menu to UTC when importing your pictures. The corresponding menu item is conveniently located at the bottom of the menu.
In a neat twist, Aperture is smart about daylight saving time: When you select a time zone for a photo, Aperture determines whether daylight saving time was in effect on the day the photo was taken. If so, an hour is added to the adjusted time, and the time zone identifier listed in a photo’s time stamp reflects this as well: For example, GMT+1 for Berlin and MST (Mountain Standard Time) for Denver turn into GMT+2 and MDT (Mountain Daylight Saving Time), respectively.
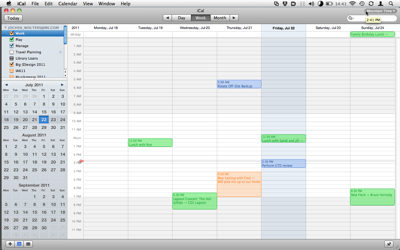
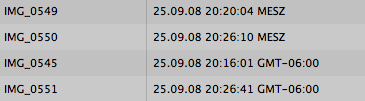
Aperture even takes time zones into account when sorting images. According to the nominal time stamps in the following screenshot, IMG_0545 was taken before IMG_0549 and IMG_0550. When converting MESZ to the GMT-6 time zone by subtracting eight hours, however, IMG_0549 and IMG_0550 were taken shortly after noon that day, and they correctly appear before IMG_0545.
Unfortunately, Aperture also applies this logic when selecting photos via the Calendar filter, sometimes causing a photo’s date to shift by a day. The photos in the following screenshot were taken on September 25 at GMT-6. Aperture translates the dates to the computer’s time zone — in this case, GMT+2 — and displays the images on the calendar for September 26.

I am not sure whether this is a bug or intended behavior. I do think, though, that it is wrong, because it feels more natural to link a photo to the date when it was actually shot, than to whatever date this corresponds to in another part of the world.
Similarly, Aperture displays both a “File Date” and an “Adjusted Date” in its import window, but already adjusts the former for the time zone you’re in. Therefore, very often the “File Date” is not the file date. Because Aperture bases the “Adjusted Date” preview on the “File Date”, the latter will be incorrect, as well, which is extremely confusing.
Apart from these two glitches, Aperture’s handling of time zones is very well designed: while you have complete control over selecting an image’s time zone, Aperture spares you unnecessary headaches and extra work by taking care of daylight saving time for you.
OmniFocus: The stealth approach to time zones
In both iCal and Aperture, these applications’ time zone features are easy to discover, because the related controls are easily visible. In contrast, OmniFocus, a high-end task manager by the Omni Group, takes a stealth approach to time zones.
Every task stored in OmniFocus can have a start date and a due date. A Completed date shows when a task was checked off. All three of these include both date and time.
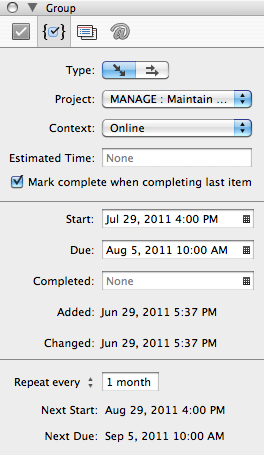
When you enter a date without explicitly defining a time for it, the Start field will default to 12:00 midnight. The Due date’s default can be configured in the app’s preferences, and I keep this set to 6:00pm.
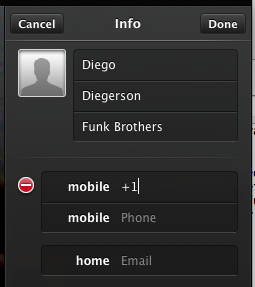
It came as quite a surprise to find out that OmniFocus does recognize your computer’s system time zone, and adjusts all of its Start, Due, Completed, and even the Added and Changed dates accordingly.
I only noticed this when I noticed that the dates for my tasks were off, just like in the screenshot above: instead of 12:00m and 6:00pm, the times are 4:00pm and 10:00am while I was in Colorado, whose Mountain Time zone is eight hours behind Germany’s Central European Time.
And yet, I checked OmniFocus’ online help, its user manual, and the online FAQ, and none of these mention this feature!
The major caveat is that this automatic adjustment can shift a task’s start or due dates to another calendar day: Let’s say I’d add a task with a due date of July 22, 2011 6:00 PM Mountain Time. When I travel back to Europe, that time stamp moves to July 23, 2011 4:00PM, effectively moving the due date to the next day.
While there may be circumstances where the date for a task should be adjusted for changes in time zones — e.g., when you have to hand in a deliverable to someone by a certain time –, I consider it much more likely that you set start and due dates within the mindset of a normal work day.
In other words, “due” usually means “finish this by the end of day X”, regardless of where and, thus, in which time zone, you work on that task. That’s why I would prefer a default behavior of not adjusting dates for time zones in this kind of application.
If a feature with this kind of (potential) impact is implemented, it should at least be fully documented, and allow some basic control over how it works.
Similar to iCal’s implementation, I wish time zone support in OmniFocus and similar programs were an option, and a time zone menu near the respective date fields should include a Floating setting.
Some suggestions for time zone support in software applications
In case you are developing an application that works with dates and times, here are a few ideas to keep in mind when implementing time zone support:
-
Make it visible: If your application supports time zones, make this obvious. Don’t silently adjust the time, but include a time zone marker like “MST” or “GMT+2” in date fields. Also, describe the feature in the user manual.
-
Show where you are: Point out to the user which time zone they are currently in (as defined by the computer’s system time zone setting), e.g., by highlighting it in the time zone menu.
-
Keep time zone menus clutter-free: Depending on how your application is used, let the user manually configure that menu instead of providing a complete listing of all existing time zones.
-
Sort time zone menus by location, not time zone: It is much easier to find a time zone based on its continent and city, than by offset versus GMT. Sort time zone menus accordingly.
- Make it obvious how daylight saving time is handled: Display the time zone name in date and time fields, so it becomes obvious whether that time stamp is shown for daylight saving time, or not. And, again, properly cover this in the application#s manual.
-
This article is based on iCal 4 that shipped with OS X 10.6 Snow Leopard. There are a few differences between that version and the one that comes with the freshly released 10.7 Lion, but the features related to time zone support remain almost unchanged. The only difference I found is the naming of time zones as explained in the article. ↩
-
By default, iCal’s time zone support is deactivated. The checkbox for turning it on is located in the program’s Advanced preferences pane. ↩
-
You will find this nugget of photography wisdom all over the ‘Net now, but I first heard it from Randal Schwartz and Derrick Story. ↩
-
That is, when importing photos while you’re in the time zone that they were taken in. Since I try to import my photos on the same day they were taken, that is usually the case for me. ↩