A Bit of TLC for an Online Concert Schedule

One of the biggest festivals on Northern Colorado’s lively music scene is Bohemian Nights, which takes place during the New West Fest in Fort Collins. Kicking off tonight1, this year’s event boasts 80 bands. A customizable concert schedule lets you pick and choose from this sonic abundance.

Here’s what I would consider a common scenario for using such a schedule: After deciding when you are free to attend the festival, you search (or filter) the schedule for all bands who will be playing while you’re there, and whose music appeals to you. You then make your selection from the resulting list.

Let’s see how easy it is to accomplish this on the Bohemian Nights website.2

Finding concert details

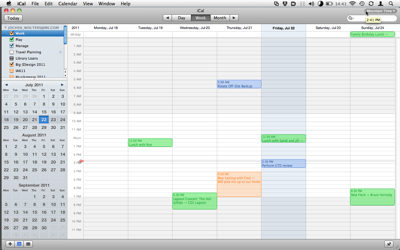
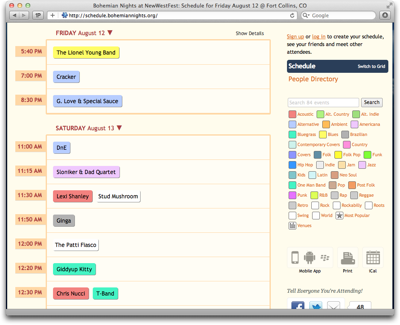
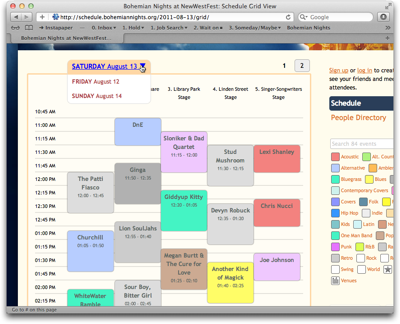
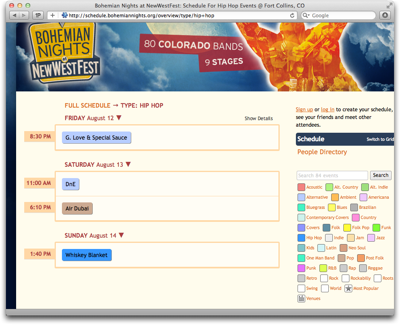
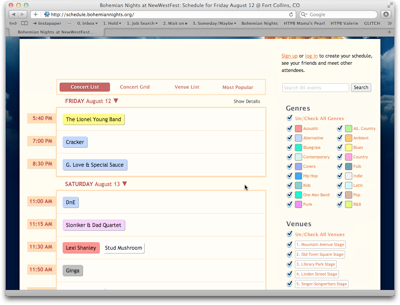
The schedule’s default view is a chronological list, grouped by day and start time.

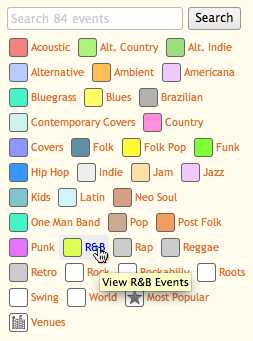
Immediately visible are only the bands’ names. These are displayed against a colored rectangle to indicate their music’s genres. A list on the right shows what color corresponds to what genre (referred to on the site as “[music] types”).

BNSchedule

For a better overview over the schedule, you can also view the concerts on a grid. In this case, though, you can only see one day’s schedule at a time, and depending on its length, the view may be paginated as well.

BNScheduleGrid

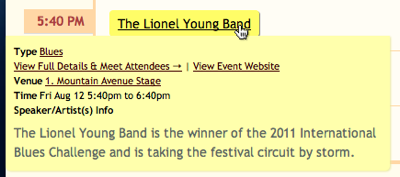
Complete information — comprising genre, date and time, venue, and a short info blurb — is available for each concert. You can view this information in three ways: hover your mouse pointer over a band name to make a tooltip-like overlay appear; …

BNScheduleDetailTooltip

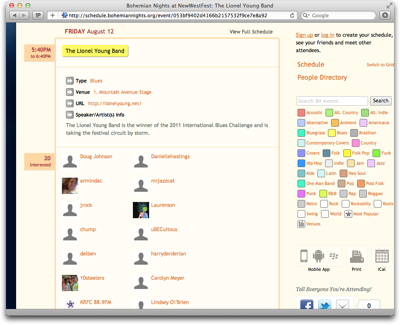
… click on a band to show the information on a separate page; …

BNScheduleDetailPage

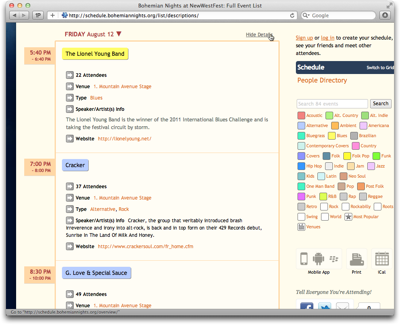
… or click on Show Details above the schedule to display information as in-line boxes on the schedule.

BNScheduleDetailBox

Obviously, it is rather tedious to “manually” scan all 80, or so, entries on the schedule to find interesting bands, regardless of which of these three methods you use to view the detailed information.

Equally tedious is the attempt to correlate a band’s color with the genre list. With a total of 35 genres, many of which share highly similar, if not identical colors, the limitations in your eyes’ ability to differentiate between these colors will soon become apparent.

What’s more, many bands are listed under more than one genre, but the color only reflects one of these.

BNScheduleGenreList

A much easier approach to work along the usage scenario would be to filter the schedule, so that it would only list those events that match the search criteria.

Add some music to your day

Although this is not directly apparent, you can, indeed, filter the schedule by genre by clicking on any of the genres in the list, but you cannot select more than one genre at a time.

BNScheduleFiltered

To “reset” this filter, you need to click on “Full Schedule”, which is placed far away from the genre list. Finding this function would be easier if it were implemented as an All Genres option and grouped together with the other genre “selectors”.

What the genre list does include are two items called Most Popular and Venues that are not genres at all.

By (most) popular request

Most Popular ranks performers based on the number of people who signified via the schedule’s social features, that they are “interested” in a particular band.

Note how the genre list does contain an All Types item here. That is because clicking any genre in this view will display the rankings within that genre, and All Types takes you back to the full ranking.

BNScheduleMostPopular

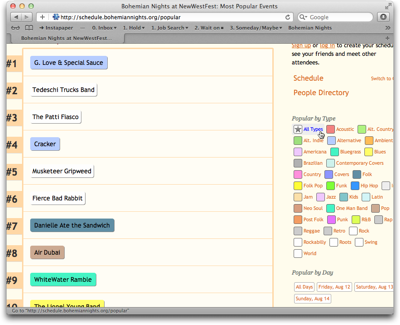
In addition to filtering by genre, you can also filter the rankings by day, but you can only select one day (or All Days) at a time. What’s more, although they have their own group and are not placed close to the genres, clicking any of the Popular by Day filters also resets the genre filter!

That is, you can see the ranking for a certain genre (or All Types) or a certain day (or All Days); you cannot filter by genre as well as day at the same time, though.

Where did those guys play again?

The Venues view looks similar to the regular schedule, but it groups the concerts by venue. Through a Venues filter section, you can limit the display to show only bands playing on a certain stage.

BNScheduleVenue

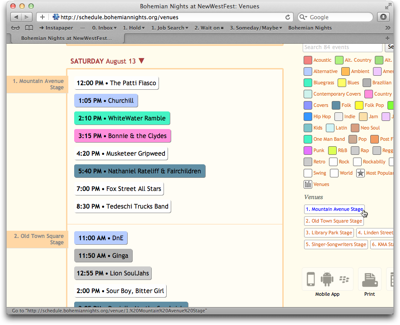
If you click on a genre in this view, you are immediately taken back to the regular schedule for that genre instead of viewing the genre grouped by venue.

Take me back where I belong

If you’re in either Most Popular or Venues view, the link to get back to the “normal” schedule view is not atop the schedule where it was when filtering the list by genre. Instead, the link to click is the header-like Schedule line above People Directory in the column on the right.

Although the Schedule link is highlighted when you’re viewing the schedule, it was difficult for me to find. It just feels illogical to have to use links in two different locations to get to the same page on the site.

Tidying up just a lil’ bit

The extensive information that is made accessible via this schedule is great for planning a visit to Bohemian Nights, but the navigation of the schedule is confusing.

The key reason, in my opinion, is that the site’s information architecture does not reflect the underlying data structures very well.

In essence, there are four different views on the available data:

  1. Concert list: Grouped by date. Sorted by date and time. Filtered by genre.

  2. Concert grid: Grouped by date and venue. Sorted by date and time. (Cannot be filtered.)

  3. Venue list: Grouped by date and venue. Sorted by date, venue, and time. Filtered by venue.

  4. Most popular: Ungrouped. Sorted by popularity. Filtered by genre or date.

In all cases, filtering determines what data is being displayed, and grouping and sorting determine how the data is displayed. To make it easier to grasp this structure, the views should be separated from the filters, and this separation should also be reflected in the UI.

Based on this approach, here’s a suggestion for a slightly different layout3 for this page:

BNScheduleRedesign

Venues and Most Popular are part of a view selection that also includes the default List view plus its Grid variation. All filter groups are always displayed in the column on the right. Instead of being links which only allow single selections, they provide checkboxes for multiple selections, and each filter operates independently from the others.

This design would not only provide more powerful filtering, but also arrange all UI elements in a consistent, logically grouped layout.


  1. Friday, 12 August 2011. 

  2. This schedule is based on SCHED, which offers “Social Mobile Apps & Calendars For Events”. For this article, I focus on the Bohemian Nights website, so I don’t know what features beyond those used on this site are provided by the SCHED software. 

  3. Consider this a colored wireframe. It’s nowhere near production quality. 

Time Zone Support in Software Applications

In a previous article I asked “What time is your zone?”, and compared the ways in which you set a computer’s system time zone in Mac OS X, Windows, and Ubuntu Linux. Besides the system-wide setting, you can also find support for time zones in application software like the three apps I observed for this article.

iCal: Setting the time zone for the calendar view

The obvious example is, of course, a calendar application like iCal, which ships with Apple’s Mac OS X operating system.4

ICalMainWindow

The time zone for iCal’s calendar view is selected via a menu in the top-right corner of the application’s single main window.5 Note the nifty tooltip: when you hover the mouse pointer over the menu, a tooltip will display the time for the currently selected time zone.

ICalTimeZoneMenu

Initially, the only entry in this menu is the computer’s system time zone. Selecting Other… brings up a dialog box with a map and a search field. By clicking on the map or searching for a city, you select another time zone to be added to the menu.

ICalTimeZoneMenuOpen

Unfortunately, the underlying database of cities is not nearly as extensive as the one that powers Mac OS X’s Date & Time system preferences. Where the latter even finds very small towns (and this has been improved further in OS X 10.7 Lion), iCal is only aware of one or two major cities per country and time zone.

ICalTimeZoneMap

Unless you travel to a lot of different countries all over the planet, you will likely only require a handful of time zones to be listed in this menu. Hence, instead of providing a lengthy menu of all time zones known to man, it makes sense to require the user to manually add further time zones.

iCal: Setting the time zone for an event

In iCal, time zones are assigned to events via a menu in an event inspector window. This menu contains two items that are not found in the main window’s menu: UTC and Floating.

ICalEventTimeZoneMenu

UTC — [Universal Time Coordinated](http://en.wikipedia.org/wiki/Coordinated_Universal_Time “Read the Wikipedia entry on UTC” ) — is the world-wide authoritative time reference, so it deserves its special spot.

“Floating” is not actually a time zone. Rather, it denotes that an event’s time should not be adjusted for time zones at all. Instead, floating events are displayed at the same time in the calendar view, regardless what time zone that view is set to.

This is a handy feature for events that you always perform at the same time, no matter where you are, for example your weekly GTD review or your daily meditation session.

When you create a new event, iCal pre-sets the inspector menu to the time zone selected for iCal’s main window. If the desired time zone is not yet included in the menu, you can add a new one from within the inspector window via the Other… menu item.

This brings up a little map view, in which the time zone for the current menu selection is highlighted, but no other information is displayed.

ICalEventTimeZoneMap

With your only option being to click on the map and then select a city from a popup menu, finding the right time zone can be tedious unless you already have at least a rough idea of its geographical location.

ICalEventTimeZoneMapSelection

Finding a time zone based on a city name is easier when you use the main window’s menu, because that gives you the comfort of the search field. Since the menus in the main window and the event inspector are synchronized, you can freely choose which path you prefer.

iCal: Two menus that (unfortunately) are like one

While this synchronization of the two time zone menus generally makes sense, I have mixed feelings about this feature.

Unfortunately, there is no way to remove any entries from either menu (unless you are willing to manually edit iCal’s preferences file). Whenever you add a new time zone in iCal, you’re stuck with it.

What’s worse, however, is that both menus are always sync’ed even though it not always makes sense to add an events’ time zone to the calendar view menu.

Imagine, for example, that you have scheduled a phone call with someone in Sydney, Australia, and that person gives you the desired call time for their own time zone.

Entering the event for the appropriate time zone, Australia Eastern, spares you the trouble of converting the times to your own time zone. But unless you ever travel to Australia, why would you need to set your calendar’s main view to that time zone?

In other words, adding Australia Eastern to the event time zone menu makes sense, whereas adding it to the calendar view menu only adds clutter, because you will most likely never set your calendar to this location.

iCal: A major change of cat, a minor change of time zone support

For Mac OS 10.7, Apple redesigned the visual appearance of the calendar app. With regards to time zones, though, there is only one change: instead of time zone names, the menus now list countries. E.g., instead of Central European Time, it may list Germany Time.

TimeZoneMenuLion

This does result in multiple menu items for the same time zone, e.g., Germany Time and Netherlands Time, which both lie in the Central European Time zone. Then again, it is easier to remember what country you are traveling to than the time zone for that country.

Aperture: Being smart about daylight saving time

My favorite piece of advice on photo management is to always keep your camera’s clock set to UTC and make all time zone adjustments in your photo software. That way, you never have to remember to change the camera’s clock, or try to recall between which photos you did so.6

In Apple Aperture, which I use for managing my photos, you adjust the time zone via a pair of popup menus: one for selecting the camera’s time zone, and one for the selecting the time zone of the location where the photo was taken.

ApertureTimeZoneMenuPair

Aperture pre-selects the computer’s time zone in both menus, so that, in most cases7, all you need to do is set the camera menu to UTC when importing your pictures. The corresponding menu item is conveniently located at the bottom of the menu.

ApertureTimeZoneMenu

In a neat twist, Aperture is smart about daylight saving time: When you select a time zone for a photo, Aperture determines whether daylight saving time was in effect on the day the photo was taken. If so, an hour is added to the adjusted time, and the time zone identifier listed in a photo’s time stamp reflects this as well: For example, GMT+1 for Berlin and MST (Mountain Standard Time) for Denver turn into GMT+2 and MDT (Mountain Daylight Saving Time), respectively.

Aperture even takes time zones into account when sorting images. According to the nominal time stamps in the following screenshot, IMG_0545 was taken before IMG_0549 and IMG_0550. When converting MESZ to the GMT-6 time zone by subtracting eight hours, however, IMG_0549 and IMG_0550 were taken shortly after noon that day, and they correctly appear before IMG_0545.

ApertureImageSortOrder

Unfortunately, Aperture also applies this logic when selecting photos via the Calendar filter, sometimes causing a photo’s date to shift by a day. The photos in the following screenshot were taken on September 25 at GMT-6. Aperture translates the dates to the computer’s time zone — in this case, GMT+2 — and displays the images on the calendar for September 26.

ApertureShiftingDates

I am not sure whether this is a bug or intended behavior. I do think, though, that it is wrong, because it feels more natural to link a photo to the date when it was actually shot, than to whatever date this corresponds to in another part of the world.

Similarly, Aperture displays both a “File Date” and an “Adjusted Date” in its import window, but already adjusts the former for the time zone you’re in. Therefore, very often the “File Date” is not the file date. Because Aperture bases the “Adjusted Date” preview on the “File Date”, the latter will be incorrect, as well, which is extremely confusing.

Apart from these two glitches, Aperture’s handling of time zones is very well designed: while you have complete control over selecting an image’s time zone, Aperture spares you unnecessary headaches and extra work by taking care of daylight saving time for you.

OmniFocus: The stealth approach to time zones

In both iCal and Aperture, these applications’ time zone features are easy to discover, because the related controls are easily visible. In contrast, OmniFocus, a high-end task manager by the Omni Group, takes a stealth approach to time zones.

Every task stored in OmniFocus can have a start date and a due date. A Completed date shows when a task was checked off. All three of these include both date and time.

OmniFocusGroupInspector

When you enter a date without explicitly defining a time for it, the Start field will default to 12:00 midnight. The Due date’s default can be configured in the app’s preferences, and I keep this set to 6:00pm.

It came as quite a surprise to find out that OmniFocus does recognize your computer’s system time zone, and adjusts all of its Start, Due, Completed, and even the Added and Changed dates accordingly.

I only noticed this when I noticed that the dates for my tasks were off, just like in the screenshot above: instead of 12:00m and 6:00pm, the times are 4:00pm and 10:00am while I was in Colorado, whose Mountain Time zone is eight hours behind Germany’s Central European Time.

And yet, I checked OmniFocus’ online help, its user manual, and the online FAQ, and none of these mention this feature!

The major caveat is that this automatic adjustment can shift a task’s start or due dates to another calendar day: Let’s say I’d add a task with a due date of July 22, 2011 6:00 PM Mountain Time. When I travel back to Europe, that time stamp moves to July 23, 2011 4:00PM, effectively moving the due date to the next day.

While there may be circumstances where the date for a task should be adjusted for changes in time zones — e.g., when you have to hand in a deliverable to someone by a certain time –, I consider it much more likely that you set start and due dates within the mindset of a normal work day.

In other words, “due” usually means “finish this by the end of day X”, regardless of where and, thus, in which time zone, you work on that task. That’s why I would prefer a default behavior of not adjusting dates for time zones in this kind of application.

If a feature with this kind of (potential) impact is implemented, it should at least be fully documented, and allow some basic control over how it works.

Similar to iCal’s implementation, I wish time zone support in OmniFocus and similar programs were an option, and a time zone menu near the respective date fields should include a Floating setting.

Some suggestions for time zone support in software applications

In case you are developing an application that works with dates and times, here are a few ideas to keep in mind when implementing time zone support:

  • Make it visible: If your application supports time zones, make this obvious. Don’t silently adjust the time, but include a time zone marker like “MST” or “GMT+2” in date fields. Also, describe the feature in the user manual.

  • Show where you are: Point out to the user which time zone they are currently in (as defined by the computer’s system time zone setting), e.g., by highlighting it in the time zone menu.

  • Keep time zone menus clutter-free: Depending on how your application is used, let the user manually configure that menu instead of providing a complete listing of all existing time zones.

  • Sort time zone menus by location, not time zone: It is much easier to find a time zone based on its continent and city, than by offset versus GMT. Sort time zone menus accordingly.

  • Make it obvious how daylight saving time is handled: Display the time zone name in date and time fields, so it becomes obvious whether that time stamp is shown for daylight saving time, or not. And, again, properly cover this in the application#s manual.

  1. This article is based on iCal 4 that shipped with OS X 10.6 Snow Leopard. There are a few differences between that version and the one that comes with the freshly released 10.7 Lion, but the features related to time zone support remain almost unchanged. The only difference I found is the naming of time zones as explained in the article. 

  2. By default, iCal’s time zone support is deactivated. The checkbox for turning it on is located in the program’s Advanced preferences pane. 

  3. You will find this nugget of photography wisdom all over the ‘Net now, but I first heard it from Randal Schwartz and Derrick Story

  4. That is, when importing photos while you’re in the time zone that they were taken in. Since I try to import my photos on the same day they were taken, that is usually the case for me. 

Retrieving a Virtual Door Key

I had almost forgotten that the administrators of the WordPress.org website had to reset all passwords a few weeks ago. Until yesterday, that is, when I needed to sign into the site’s support forums, and couldn’t.

My password’s been reset! — Now what?

You can’t miss the notice about the password reset: it’s placed right above the forums’ login form.

WPPWLoginScreen

Clicking on the link in the notice takes you to the announcement on the WordPress News blog.

WPPWResetAnnouncement

It explains the reason for the password reset and, in the second paragraph, tells users that …

[t]o use the forums, trac, or commit to a plugin or theme, you’ll need to reset your password to a new one.

The link in that sentence leads directly back to the login form.

What’s problematic is that neither the login page nor the announcement make it sufficiently clear just how you request a new password. In part, this is the result of using inconsistent terms to refer to the corresponding process.

Consistency makes instructions easier to understand

Between the login screen and the news announcement, the authors used three different terms to describe the same thing:

  • “request a new [password]”
  • “recover your password”
  • “reset your password”

The third one is especially confusing: Didn’t the site’s administrators already do exactly that, namely “reset” all passwords?

In most cases, users will want to “recover” their password, because they have forgotten or misplaced it. In this particular situation, however, that term doesn’t quite have the right feel, and “request a new password” seems like a more appropriate choice.

Aside from using this phrase consistently in all references to the global password reset, it would take just a few extra words in the instructions on the login page to make it perfectly clear what the user needs to do next:

On June 21, 2011, we reset all passwords, so you’ll need to request a new one by using the Password Recovery form below if you haven’t already.

When you first need to recover what you need to know to recover what you need

It’s not just the instructional text that leaves some room for improvement: the same applies to the password recovery process itself.

When I entered the username that I had stored in my 1Password vault, and clicked “Recover Password”, the site complained that “[t]he specified user does not exist”.

After trying a few other user names, as well as my email address, which all resulted in the same error, I decided to simply register a new account.

Alas, now the site complained that my “[e]mail [address] already exists” in their database.

WPRegistrationErrorMsg

And so I’m caught in a catch-22: I can’t recover my password, because I can’t remember my user name, and I can’t create a new account unless I would want to maintain a new, additional email address.8

For most of us, our email address is the one “digital identifier” that we use most often and, thus, is the easiest for us to remember. It’s a nasty flaw that the WordPress.org password recovery process does not allow you to use your email address to identify yourself.

Just give me something to identify you

Here’s an example for a more user-friendly way to help users deal with “Login Credentials Amnesia”.

TwitterPWResetScreen

The Captcha nuisance aside, Twitter’s password recovery form accepts both username and email address, and it even uses a single text field for either one.

The instructions on the page are more reassuring than WordPress.org’s, as well: Instead of the latter’s curt “To recover your password, enter your information below.”, the Twitter form not only tells you what to do now — “Please type …” –, but also explains what will happen once you’ve completed that step, namely that “Twitter will send you password reset instructions …”.

Admittedly, the target audience for the WordPress.org site is more tech-savvy than Twitter’s and, thus, more experienced with properly guessing what tech writers really mean with their instructions.

Nevertheless, whenever a user is faced with a serious problem, it’s a welcome courtesy when the options that are available to solve that problem are as helpful, accommodating, and forgiving as possible.


  1. After yet more guesses, I luckily did come up with the correct user name, and successfully retrieved my password.